How to Create a Meaningful Funeral Booklet: A Step-by-Step Guide

Creating a funeral booklet is a heartfelt way to honor and commemorate the life of a loved one. It serves as a keepsake for attendees, offering comforting words, cherished memories, and details about the funeral service. In this step-by-step guide, we will walk you through the process of creating a meaningful funeral booklet that reflects the unique personality and life story of the deceased.
Step 1: Gather Essential Information
The first step in creating a funeral booklet is to gather all the necessary information that you want to include. This information will guide the structure and content of your booklet.
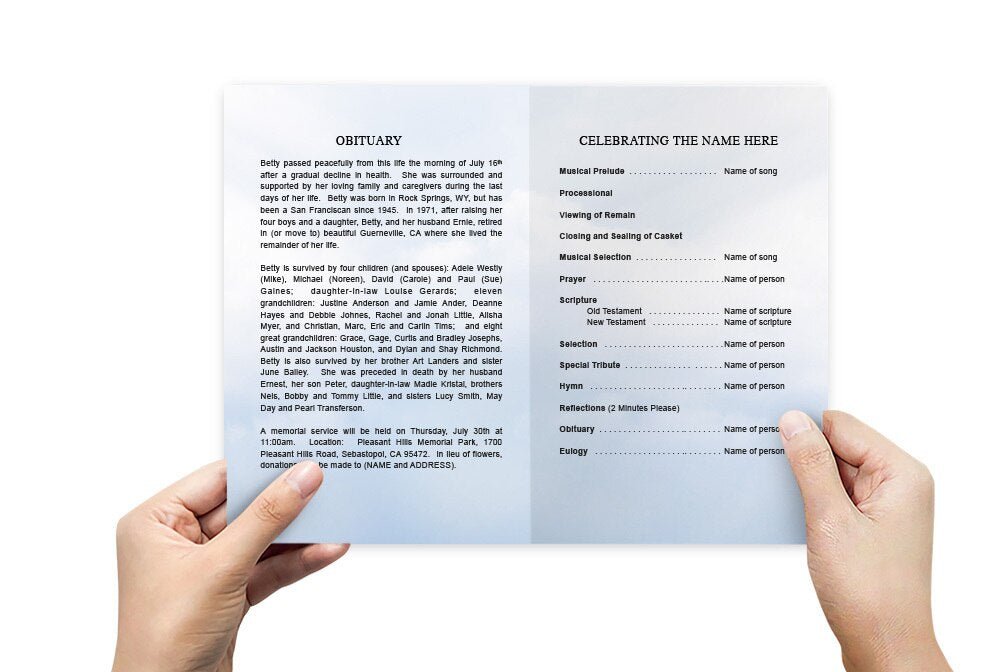
1.1 Obituary
The obituary is a core part of the funeral booklet. It offers a summary of the deceased's life, highlighting important milestones, achievements, and personal memories. Be sure to include the full name, date of birth, date of passing, and any significant details about their life, such as their education, work, family, and hobbies.
1.2 Funeral Service Details
Provide the details of the funeral or memorial service, including the date, time, and location. You can also include the order of service if applicable. This helps attendees know what to expect and guides them through the service.
1.3 Readings and Prayers
If specific readings, prayers, or poems will be shared during the service, list them in the funeral booklet. This can include religious texts, poems, or personal writings that hold special significance to the family or the deceased.
Step 2: Choose the Layout and Structure
Once you have gathered the essential information, it's time to decide how to organize and present it in the funeral booklet. The layout should be simple, easy to read, and respectful.
2.1 Funeral Booklet Size and Format
The most common format for a funeral booklet is a bifold or trifold design, but you can choose other formats based on your preference. Typically, a bifold funeral booklet consists of a front cover, inside pages, and a back cover.
2.1.1 Bifold Funeral Booklet
A bifold booklet folds once, creating four panels—front, back, and two inside pages. This format is straightforward and gives enough space to include the basic details of the service, along with photos and personal messages.
2.1.2 Trifold Funeral Booklet
A trifold booklet folds twice, creating six panels. This option allows for more space to include additional content, such as poems, more photos, and detailed life stories. It is ideal for larger services where more information might be included.
2.2 Front Cover Design
The front cover is the first thing people will see, so it should reflect the essence of the person being remembered. A tasteful design with a photo of the deceased, their full name, and the dates of their birth and passing is a common choice. Some families also choose to add a meaningful quote or scripture on the cover.
Step 3: Add Personalized Content
Personalizing the funeral booklet is what makes it truly special. This is where you can capture the spirit and personality of your loved one.
3.1 Photos
Include cherished photos of your loved one throughout the booklet. You can use a mix of formal photos, candid shots, and family pictures that represent different stages of their life. A collage page with a series of smaller photos is also a lovely way to showcase their journey.
3.1.1 Choosing the Right Photos
Select photos that highlight meaningful moments and connections. Consider adding captions under each photo to provide context or share memories associated with the image.
3.2 Messages from Family and Friends
Adding messages or tributes from family and friends makes the booklet even more personal. This could include heartfelt notes, memories, or even brief eulogies. It's a wonderful way to involve close relatives and friends in the creation of the booklet.
3.2.1 Collecting Messages
Reach out to family and friends and ask them to share their favorite memories or sentiments about the deceased. You can include these messages alongside their names and relationships to the deceased.
3.3 Poems, Quotes, and Prayers
Poems, quotes, and prayers offer comfort and solace during a difficult time. Select passages that resonate with the deceased's beliefs or personality. Religious families may want to include prayers or verses from the Bible, while others may prefer uplifting poems or inspirational quotes.
Step 4: Design and Formatting Tips
The design and formatting of your funeral booklet should be elegant and simple. Here are some tips to ensure it looks professional and visually appealing.
4.1 Font Choices
Choose fonts that are easy to read. Script fonts can be used for headings or names, but the main text should be in a clean, legible font like Arial, Times New Roman, or Calibri. Avoid using too many different fonts, as this can make the booklet look cluttered.
4.2 Color Schemes
When selecting colors, opt for soft, calming tones that reflect the mood of the service. Many families choose neutral colors like white, cream, or soft pastels. You can incorporate colors that had special meaning to the deceased, such as their favorite color or a color that symbolizes something important to them.
4.3 Photo Placement
Place photos in a way that balances the layout. Avoid crowding pages with too many images, and instead, space them out to allow each photo to shine. Consider adding a dedicated photo page to showcase a larger collection of images.
Step 5: Proofread and Finalize the Content
Before printing your funeral booklet, take the time to proofread the content. Check for any errors in names, dates, and spelling. It's also a good idea to ask another family member or friend to review the booklet to ensure everything is accurate and appropriately worded.
5.1 Review the Design
Take a final look at the design and layout. Make sure all the elements are balanced, and the booklet flows well from one section to the next. Ensure that the fonts are consistent, the photos are placed correctly, and there is no overcrowding of text or images.
5.2 Finalizing the Print Specifications
When you're happy with the funeral booklet, it's time to decide on printing options. You can choose to print the booklet at home or use a professional printing service. If you opt for a printing service, make sure to specify the type of paper, binding, and finish you prefer.
Step 6: Printing and Distribution
After finalizing the design and content, the last step is printing and distributing the funeral booklets.
6.1 Choosing the Right Paper
Select high-quality paper that feels substantial in hand. Many families choose matte or semi-gloss paper for a professional look. The weight of the paper should be thick enough to give the funeral booklet a premium feel without being too bulky.
6.2 Distributing the Booklets
Once printed, distribute the funeral booklets at the service or send them as keepsakes to family and friends who may not have been able to attend. It’s a meaningful way to share memories and provide comfort during this time of grief.
Funeral Booklet Conclusion
Creating a meaningful funeral booklet is a thoughtful way to honor a loved one’s life. By following this step-by-step guide, you can ensure the booklet captures the essence of the deceased, providing a beautiful keepsake for family and friends. From gathering essential information to choosing the right design and printing, each step plays a part in making the booklet a cherished tribute to their memory.