How to Make a Funeral Program Template in Google Slides: A Step-by-Step Guide

When planning a funeral or memorial service, families often look for meaningful ways to celebrate the life of a loved one. A funeral program serves as both a guide to the order of service and a keepsake for attendees. While professional templates and services are available, many families prefer to create their own program for a personal touch. One of the easiest, most accessible tools for this task is Google Slides.
Google Slides may be known for presentations, but its flexibility, cloud-based accessibility, and design features make it an excellent option for funeral program templates. With just a few steps, you can create a custom design, save it as a reusable template, and share it with others online.
This step-by-step guide will show you exactly how to make a funeral program template in Google Slides, from setup to printing.
Step 1: Plan the Program Before Opening Google Slides
Before you begin designing, take a few minutes to outline the structure of your funeral program. Doing this first saves time and prevents you from rearranging things later.
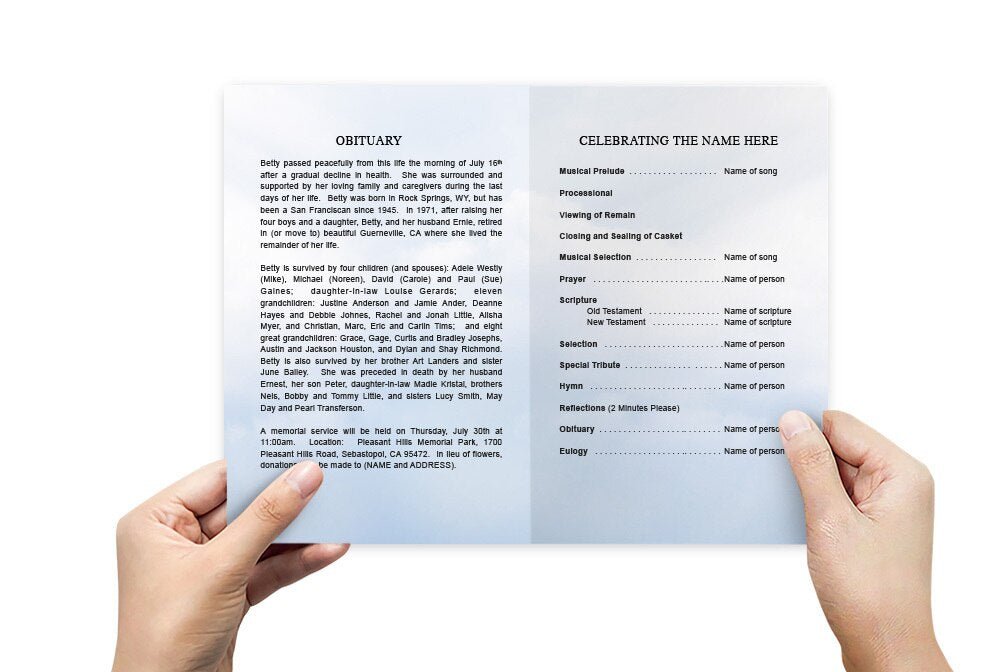
Typical funeral programs include:
-
Front Cover: Title (e.g., In Loving Memory), the name of the deceased, dates of birth and passing, and a portrait photo.
-
Back Cover: Acknowledgments, thank-you note, or details about the burial/reception.
-
Inside Left Panel: The order of service (listing prayers, hymns, readings, tributes, and eulogy).
-
Inside Right Panel: Obituary, biography, or personal tributes.
Decide whether you want a bifold program (an 8.5” x 11” sheet folded in half, creating four panels) or a trifold program (six panels). Most families choose a bifold because it balances space and simplicity.
Step 2: Open Google Slides and Start a New File
-
Go to Google Slides in your browser.
-
Select Blank Presentation from the template chooser.
-
Delete the default text boxes to start with a clean slate.
At this point, you have a plain white slide that you can customize for print rather than a presentation.
Step 3: Set Up the Page Size for Printing
Since you’ll be printing the funeral program, you need to change the default slide dimensions.
-
Click File → Page Setup.
-
In the pop-up menu, select Custom.
-
For a bifold, enter 11 x 8.5 inches (landscape orientation).
-
This matches a standard letter sheet that folds neatly in half.
-
-
For a trifold, set the dimensions to 11 x 8.5 inches but plan to divide the slide into three panels.
Click Apply, and your slide will now look more like a sheet of paper than a presentation slide.
Step 4: Add Guides for Panel Divisions
To help align content, add lines to mark folds:
-
Go to Insert → Line and draw vertical lines.
-
For a bifold, place one line at the halfway point (5.5 inches).
-
For a trifold, place two lines at 3.67 inches and 7.34 inches.
These lines won’t print, but they guide where to place text and images so they don’t fall into the fold.
Step 5: Design the Front Cover
The right half of the first slide will serve as the front panel.
-
Insert a text box for the title: “In Loving Memory of [Name].”
-
Beneath the title, add the dates of birth and passing.
-
Insert a photo of your loved one: Insert → Image → Upload from computer/Google Drive.
-
Resize and position the photo in the center. Use Format Options → Drop Shadow to add depth.
-
Add a soft background color or gradient using Background → Color.
Keep the design simple, focusing on the name and photo.
Step 6: Create the Back Cover
The left half of the first slide is the back panel. This is a good place for acknowledgments, thank-you messages, or a scripture verse.
-
Insert a text box for the acknowledgment section (e.g., “The family wishes to thank you for your support”).
-
Add funeral reception or burial details if needed.
-
Decorate with a small image such as a dove, candle, or floral clipart (Google Slides offers free icons through Insert → Image → Search the web).
Step 7: Add the Inside Pages
On the second slide, create the inside spread of the program.
-
Left Column (Order of Service):
-
Insert a text box and title it “Order of Service.”
-
List items such as Prelude, Prayer, Hymn, Reading, Eulogy, and Benediction.
-
Use bullet points for clarity.
-
-
Right Column (Obituary/Biography):
-
Insert another text box and title it “Obituary” or “Life Story.”
-
Write a short biography, including family details, career, achievements, and hobbies.
-
Break text into paragraphs for readability.
-
Insert small photos or quotes to add visual interest.
-
Step 8: Customize Fonts and Styles
Fonts set the tone of your program:
-
For titles: Choose an elegant script font (e.g., Great Vibes, Dancing Script, or Pacifico).
-
For body text: Use a clean, readable font (Arial, Lora, Open Sans, or Georgia).
-
Keep consistency: Limit yourself to two fonts—one decorative, one simple.
To apply, highlight the text and use the Font menu in the toolbar.
Step 9: Apply Colors and Themes
Colors should reflect the tone of the service. Soft, muted palettes work best—lavender, navy, beige, or soft greens.
-
Select a text box or background.
-
Click Fill Color to choose custom shades.
-
Use the Theme Builder (under Slide → Edit Theme) to apply a consistent style across all pages.
Step 10: Add Borders, Shapes, and Decorations
Visual elements give your program a finished look:
-
Use Shapes → Rectangle with no fill and a border line to frame text or photos.
-
Insert Lines to separate sections.
-
Add small icons (cross, heart, or flower) using Insert → Image → Search the web.
Keep decorations subtle so the text remains the focus.
Step 11: Insert Additional Photos
Photos make the program personal and heartfelt.
-
Use Insert → Image to add candid or family photos.
-
Arrange them neatly in columns or create a small collage.
-
Apply Crop → Shape to frame images in circles or rounded rectangles.
Step 12: Proofread and Review
Before saving, carefully review:
-
Names, dates, and service details.
-
Alignment of text boxes (don’t let words run into fold lines).
-
Font consistency and readability.
-
Photo clarity (use high-resolution images).
Use Present Mode to see how the design looks full screen.
Step 13: Save as a Template
To make your layout reusable:
-
Rename your file something like Funeral Program Template.
-
Store it in a dedicated Google Drive folder.
-
When needed again, open the template and select File → Make a copy to create a new version without overwriting the original.
Step 14: Export for Printing
For professional results, always export as a PDF:
-
Go to File → Download → PDF Document (.pdf).
-
This ensures formatting and fonts stay intact, even when printing elsewhere.
-
Share the PDF with family members, or upload it to a print shop.
Step 15: Print the Program
-
At home: Use quality paper (28–32 lb. or light cardstock). Print in color if possible. Fold carefully for a clean edge.
-
At a print shop: Send the PDF and specify double-sided printing. They can fold, trim, and finish the programs professionally.
Final Tips for a Meaningful Program
-
Keep designs uncluttered—white space helps readability.
-
Use high-quality photos for clarity.
-
Stick with two fonts and two to three colors.
-
Print one test copy before printing the full set.
-
Share a digital version with those unable to attend.
Final Thoughts
Google Slides is a free, flexible, and collaborative tool for creating funeral program templates. Its combination of text boxes, image support, and layout flexibility makes it as effective as paid design software. By following these steps—setting up your document, designing each panel, customizing fonts and colors, and saving as a reusable template—you can create a beautiful, heartfelt program that honors your loved one’s memory.
The best part is that once saved, the template can be reused for other family members, friends, or even as a service offered to others. This makes it not just a single-use design, but a meaningful tool for creating lasting tributes.