How to Make Your Own Funeral Program Template

Creating a funeral program is an important part of honoring and remembering a loved one. A program provides attendees with the order of service, personal details about the deceased, and often includes photos and meaningful tributes. While many families choose to purchase ready-made designs, making your own funeral program template allows you to create something truly personalized. With just a few basic tools and some guidance, you can design a template that reflects your loved one’s life and legacy.
Step 1: Choose Your Software
The first step is deciding which program you’ll use. Popular choices include Microsoft Word, Publisher, Google Docs, Pages (for Mac), or design tools like Canva. Each option allows for easy text formatting, photo placement, and layout customization. Word processing programs are straightforward, while Canva and Publisher provide more design flexibility.
Step 2: Select a Layout and Size
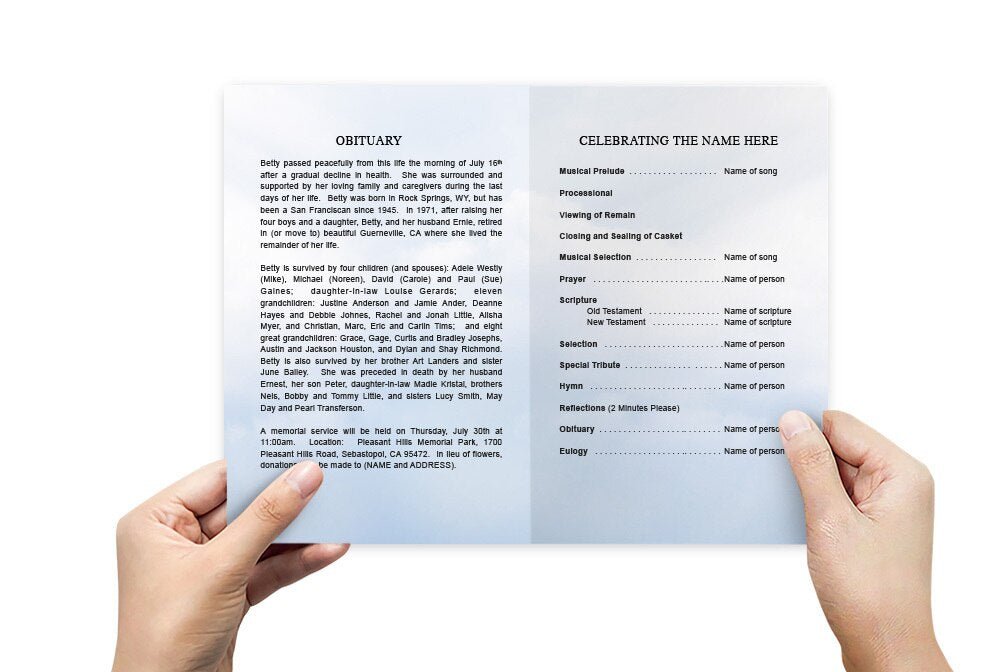
Funeral programs are most commonly made in bifold format (an 8.5" x 11" sheet folded in half). Other options include trifold brochures or a single-page flyer. Choose the layout based on how much information you want to include. A bifold program usually has a front cover, two inside pages, and a back cover for details like acknowledgments or poems.
Step 3: Gather Content
Collect the necessary information before starting your design. Common details include:
-
Full name, birth and passing dates
-
Obituary or life story
-
Photos
-
Order of service
-
Scriptures, poems, or quotes
-
Acknowledgments from the family
Having everything prepared in advance makes the process smoother.
Step 4: Design the Front Cover
The cover is often the most personalized part of the program. Include the loved one’s name, dates, and a meaningful photo. Add a background image, floral border, or subtle pattern to enhance the design. Keep the style consistent with the person’s personality and the tone of the service.
Step 5: Format the Inside Pages
On the inside pages, list the order of service—such as prayers, readings, songs, and eulogies—in the correct sequence. You may also include a short biography, tributes, or favorite sayings. Use clear fonts and adequate spacing so guests can easily follow along during the ceremony.
Step 6: Finish the Back Cover
The back cover is a good place for acknowledgments, expressions of gratitude, or a closing prayer. Many families also include a photo montage, a favorite scripture, or even service details such as the interment location and reception information.
Step 7: Save and Print
Once your design is complete, save it as both an editable file and a PDF for printing. You can print at home using quality paper (matte or glossy cardstock works best), or send it to a local print shop for professional results.
Tips for a Meaningful Program
-
Keep the design simple and uncluttered.
-
Choose colors that reflect your loved one’s personality.
-
Use high-quality images to ensure clarity in print.
-
Print a test copy before finalizing.
By creating your own funeral program template, you not only save money but also craft a keepsake that family and friends can cherish. This personalized touch makes the service more meaningful and provides comfort during a difficult time.